


© WW2 Market Garden – all rights reserved – disclaimer
BRITISH MEDAL CITATIONS
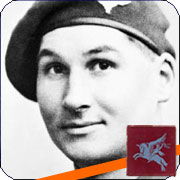
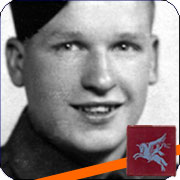 Name: Lance Sergeant John Baskeyfield
Unit: 2nd battalion South Staffordshire Regiment, 1st Airlanding Brigade, 1st Airborne Division
Place and date: Oosterbeek, 20 September 1944
On 20th September 1944, during the Battle of Arnhem, Lance Sergeant Baskeyfield was the NCO in charge of a six-pounder anti-tank gun at Oosterbeek. The enemy developed a major attack on this sector with infantry, tanks and self-propelled guns with the obvious intention to break into and overrun the battalion position. During the early stage of the action the crew commanded by this nco was responsible for the destruction of two Tiger tanks and at least one self-propelled gun, thanks to the coolness and daring of this nco who with complete disregard for his own safety allowed each tank to come well within 100 yards before opening fire. In the course of this preliminary engagement Lance Sergeant Baskeyfield was badly wounded in the leg and the remainder of his crew were either killed or badly wounded. During a brief respite after the engagement Lance Sergeant Baskeyfield refused to be carried to the Regimental Aid Post and spent his time attending to his gun and shouting encouragement to his comrades in neighbouring trenches. After a short interval the enemy renewed the attack with even greater ferocity than before, under cover of intense mortar and shell fire. Manning his gun quite alone, Lance Sergeant Baskeyfield continued to fire round after round at the enemy until his gun was put out of action. By this time his activity was the main factor in keeping the enemy tanks at bay. The fact that the surviving men in his vicinity were held together and kept in action was undoubtedly due to his magnificent example and outstanding courage. Time after time the enemy attacks were launched and driven off. Finally when his gun was knocked out Lance Sergeant Baskeyfield crawled under intense enemy fire to another six-pounder gun nearby, the crew of which had been killed and proceeded to man is single handed. With this gun he engaged an enemy self-propelled gun which was approaching to attack. Another soldier crawled over open ground to assist him but was killed almost at once. Lance Sergeant Baskeyfield succeeded in firing two rounds at the SP gun, scoring direct hits, which rendered it ineffective. Whilst preparing to fire a third show, however, he was killed by a shell from a supporting enemy tank. The superb gallantry of this nco is beyond praise. During the remaining days at Arnhem, stories of his valour were a constant inspiration to all ranks. He spurned danger, ignored pain and, by his supreme fighting spirit, infected all who witnessed his conduct with the same aggressiveness and dogged devotion to duty, which characterised his actions throughout.
VICTORIA CROSS
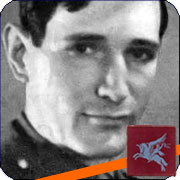 Name: Lieutenant John H. Grayburn
Unit: 2nd Parachute Battalion, 1st Parachute Brigade, 1st Airborne Division
Place and date: 17-20 September 1944
Lieutenant Grayburn was a platoon commander of 2nd Battalion The Parachute Regiment which was dropped on 17th September 1944 with the task of seizing and holding the bridge over the Rhine at Arnhem. The north end of the bridge was captured and, early in the night, Lieutenant Grayburn was ordered to assault and capture the southern end with his platoon. He led his platoon onto the bridge and began the attack with the utmost determination, but the platoon was met by a hail of fire from two 20mm quick firing guns and from machine guns of an armoured car. Almost at once Lieutenant Grayburn was shot through the shoulder. Although there was no cover on the bridge and in spite of his wounds, Lieutenant Grayburn continued to press forward with the greatest dash and bravery until casualties became so heavy that he was ordered to withdraw. He directed the withdrawal from the bridge personally and was himself the last man to come off the embankment into comparative cover. Later his platoon was ordered to occupy a house which was vital to the defence of the bridge and he personally organised the occupation of the house. Throughout the next day and night the enemy made ceaseless attacks on the house, using not only infantry with mortars and machine-guns but also tanks and self-propelled guns. The house was very exposed and difficult to defend and the fact that it did not fall to the enemy must be attributed to Lieutenant Grayburn’s great courage and inspiring leadership. He constantly exposed himself to enemy fire while moving among and encouraging his platoon and seemed completely oblivious to danger. On 19th September the enemy renewed his attacks which increased in intensity as the house was vital to the defence of the bridge. All the attacks were repulsed due to Lieutenant Grayburn’s valour and skill in organising and encouraging his men until eventually the house was set on fire and had to be evacuated. Lieutenant Grayburn took command of elements of all arms, including the remainder of his own company, and reformed them into a fighting force. He spent the night reorganising a defensive position to cover approaches to the bridge. On 20th September he extended his defence by a series of fighting patrols which prevented the enemy from gaining access to the houses in the vicinity, the occupation of which would have prejudiced the defence of the bridge. This forced the enemy to bring up tanks which brought Lieutenant Grayburn’s position under such heavy fire that he was forced to withdraw to an area further north. The enemy now attempted to lay demolition charges under the bridge and the situation was critical. Realising this, Lieutenant Grayburn organised and led a fighting patrol, which drove the enemy off temporarily and gave time for the fuses to be removed. He was again wounded, this time in the back but refused to be evacuated. Finally, an enemy tank against which Lieutenant Grayburn had no defence approached so close to his position that it became untenable. He then stood up in full view of the tank and personally directed the withdrawal of his men to the main defensive perimeter to which he had been ordered. He was killed that night. From the evening of 17th September until the night of 20th September, a period of over three days, Lieutenant Grayburn led his men with supreme gallantry and determination. Although in pain and weakened by his wounds, short of food and without sleep, his courage never flagged. There is no doubt that, had it not been for this officer’s inspiring leadership and personal bravery, the Arnhem bridge could never have been held for this time.
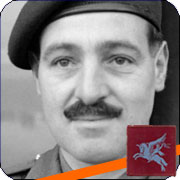
 Name: Captain Lionel E. Queripel
Unit: Company A, 10th Battalion, 4th Parachute Brigade, 1st Airborne Division
Place and date: Oosterbeek, 19 September 1944
In the Netherlands on 19th September 1944, Captain Queripel was acting as company commander of a composite company composed of three Battalion The Parachute Regiments. At 1400 hours on that day, his company was advancing along a main road which ran on an embankment towards Arnhem. The advance was conducted under continuous machine gun fire which, at one period, became so heavy that the company became split on either side of the road and suffered considerable losses. Captain Queripel at once proceeded to reorganise his force, crossing and recrossing the road whilst doing so, under extremely heavy and accurate fire. During this period he carried a wounded sergeant to the Regimental Aid Post under fire and was himself wounded in the face. Having organised his force, Captain Queripel personally led a party of men against a strong point holding up the advance. This strong point consisted of a capture British anti-tank gun and two machine-guns. Despite the fire directed at him, Captain Queripel succeeded in killing the crews of the machine-guns and also recapturing the anti-tank gun. As a result of this the advance was able to continue. The flanking movement proved fruitless, however, and little ground was gained in what was to be the final attacking action of the 1st Airborne Division at Arnhem. During the evening, whilst the 4th Para Brigade was in the process of transferring its vehicles through a tunnel beneath the railway line, Queripel was given command a composite company, consisting of A Company and men from two other battalions, and was ordered to hold a small finger of woodland to the north-east of Wolfheze, less than a quarter of a mile from the tunnel. This area was vital to the defence and as such it was pressed very hard by the Germans throughout Tuesday night, but the company held it with great valour until early the next morning. The citation continues: Later in the same day Captain Queripel found himself cut off with a small party of men and took up position in a ditch. By this time he had received further wounds in both arms. Regardless of his wounds and of the very heavy mortar and Spandau fire, he continued to inspire his men to resist with hand grenades, pistols and the few remaining rifles. As, however, the enemy pressure increased, Captain Queripel decided that it was impossible to hold the position any longer and ordered his men to withdraw. Despite their protests, he insisted on remaining behind to cover their withdrawal with his automatic pistol and a few remaining hand grenades. This was the last occasion on which he was seen. During the whole period of nine hours of confused and bitter fighting Captain Queripel displayed the highest standard of gallantry under the most difficult and trying circumstances. His courage, leadership and devotion to duty were magnificent and an inspiration to all.
 Name: Major Robert H. Cain
Unit: 2nd South Staffordshire Regiment, 1st Airlanding Brigade, 1st Airborne Division
Place and date: 19-25 September 1944
In Holland on 19th September, 1944, Major Cain was commanding a rifle company of the South Staffordshire Regiment during the Battle of Arnhem when his company was cut off from the rest of the battalion and during the next six days was closely engaged with enemy tanks, self-propelled guns and infantry. The Germans made repeated attempts to break into the company position by infiltration and had they succeeded in doing so the whole situation of the Airborne Troops would have been jeopardised. Major Cain, by his outstanding devotion to duty and remarkable powers of leadership, was to a large extent personally responsible for saving a vital sector from falling into the hands of the enemy. On 20th September a Tiger tank approached the area held by his company and Major Cain went out alone to deal with it armed with a Piat. Taking up a position he held his fire until the tank was only 20 yards away when he opened up. The tank immediately halted and turned its guns on him, shooting away a corner of the house near where this officer was lying. Although wounded by machine gun bullets and falling masonry, Major Cain continued firing until he had scored several direct hits, immobilised the tank and supervised the bringing up of a 75 mm. howitzer which completely destroyed it. Only then would he consent to have his wounds dressed. In the next morning this officer drove off three more tanks by the fearless use of his Piat, on each occasion leaving cover and taking up position in open ground with complete disregard for his personal safety. During the following days, Major Cain was everywhere where danger threatened, moving amongst his men and encouraging them by his fearless example to hold out. He refused rest and medical attention in spite of the fact that his hearing had been seriously impaired because of a perforated eardrum and he was suffering from multiple wounds. On 25 September the enemy made a concerted attack on Major Cain’s position, using self-propelled guns, flame throwers and infantry. By this time the last Piat had been put out of action and Major Cain was armed with only a light 2″ mortar. However, by a skilful use of this weapon and his daring leadership of the few men still under his command, he completely demoralized the enemy who, after an engagement lasting more than three hours, withdrew in disorder. Throughout the whole course of the Battle of Arnhem, Major Cain showed superb gallantry. His powers of endurance and leadership were the admiration of all his fellow officers and stories of his valour were being constantly exchanged amongst the troops. His coolness and courage under incessant fire could not be surpassed.
Note: the action described on the 20th actually took place on the 21st and the Tiger tank was in fact a STUG III.
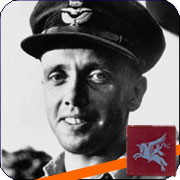 Name: Flight Lieutenant David S.A. Lord
Unit: No. 271 Squadron, No. 46 Group RAF
Place and date: Wolfheze, 19 September 1944
Flight Lieutenant Lord was pilot and captain of a Dakota aircraft detailed to drop supplies at Arnhem on the afternoon of the 19th September, 1944. Our airborne troops had been surrounded and were being pressed into a small area defended by a large number of anti-aircraft guns. Air crews were warned that intense opposition would be met over the dropping zone. To ensure accuracy they were ordered to fly at 900 feet when dropping their containers. While flying at 1,500 feet near Arnhem the starboard wing of Flight Lieutenant Lord’s aircraft was twice hit by anti-aircraft fire. The starboard engine was set on fire. He would have been justified in leaving the main stream of supply aircraft and continuing at the same height or even abandoning his aircraft. But on learning that his crew were uninjured and that the dropping zone would be reached in three minutes he said he would complete his mission, as the troops were in dire need of supplies. By now the starboard engine was burning furiously. Flight Lieutenant Lord came down to 900 feet, where he was singled out for the concentrated fire of all the anti-aircraft guns. On reaching the dropping zone he kept the aircraft on a straight, and level course while supplies were dropped. At the end of the run, he was told that two containers remained. Although he must have known that the collapse of the starboard wing could not be long delayed, Flight Lieutenant Lord circled, rejoined the stream of aircraft and made a second run to drop the remaining supplies. These manoeuvres took eight minutes in all, the aircraft being continuously under heavy anti-aircraft fire. His task completed, Flight Lieutenant Lord ordered his crew to abandon the Dakota, making no attempt himself to leave the aircraft, which was down to 500 feet. A few seconds later, the starboard wing collapsed and the aircraft fell in flames. There was only one survivor, who was flung out while assisting other members of the crew to put on their parachutes. By continuing his mission in a damaged and burning aircraft, descending to drop the supplies accurately, returning to the dropping zone a second time and, finally, remaining at the controls to give his crew a chance of escape, Flight Lieutenant Lord displayed supreme valour and self-sacrifice.
 Name: Lieutenant Herbert K. Dutton
Unit: 44th Royal Tank Regiment, (British) 4th Armoured Brigade
Place and date: Sint-Oedenrode (Koevering), 25 September 1944
The President of the United States of America, authorized by Act of Congress, July 9, 1918, takes pleasure in presenting the Distinguished Service Cross to Lieutenant Herbert K. Dutton, Royal British Army, for extraordinary heroism in connection with military operations against an armed enemy in action against enemy forces on 25 September 1944. During the operations in the area of Veghel, “B” Squadron of tanks, 44th Battalion, Royal Tank Regiment, of which Lieutenant Dutton was Troop Leader, was acting in support of a battalion of the 101st United States Airborne Division in a drive to reopen the road south of the town. Lieutenant Dutton pressed his attack with such vigor and determination that the road was quickly cleared. He then led his remaining two tanks into the wooded area north of the road, and, dismounting from his tank three times to make personal reconnaissances under heavy fire, played a substantial part in clearing the area and destroying the enemy.

UNDER CONSTRUCTION:
If you have a citation that is missing from this page, please contact us.
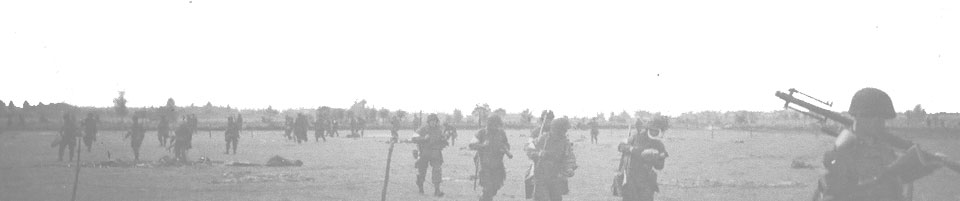
During Operation Market Garden the British army awarded various awards for valor. The five citations for the Victoria Cross (the highest award for valor) and one citation for the U.S. Distinguished Service Cross can be found on this page. We are working hard to add the other British awards for valor. They will be published to the page as soon as possible.
An added note: this page is still under construction. Even though we strive to make this list as complete as possible, we are aware that some citations are still in archives and haven’t popped up to the surface yet. If you have a citation for valor and you want to share it with us so we could publish it on this page, do not hesitate to contact us.
U.S. DISTINGUISHED SERVICE CROSS
